Hi Paul,
So here are my thoughts on light metering and exposure:
Getting proper exposure via metering:
A camera's built in light meter will at its simplest measure the aperture and shutter speed to give you a proper exposure. Of course it has limitations in that it will overexposure very dark subjects and underexpose very light subject. In addition it measures the light reflecting off the scene, not the light falling on the scene(which is what you want). This is where a 18% gray card or lightmeter comes in. I shoot with a gray card for every picture I take here. It offers very good accuracy for a fraction of the cost. It is not reflective and thus gives a great approximation of the light falling on the scene. In addition the gray card lets me set a correct white balance without a color cast although the new lights are infinitely better than the old ones in that regard. A light meter is another option that would be pinpoint accurate in measuring light but can be expensive and using a gray card is similar. I don't use one in my work.
Type of metering :
The next thing that can affect the metering is the type of light metering being done by the camera. The options are :
- Spot Metering - The camera will measure the light for a very small portion of the scene (less than 5%) Spot metering is very accurate and is not influenced by other areas in the frame.
- Average Metering : The camera will measure the light from the whole scene. This could be problematic with scenes that have a lot of dark or bright areas (ie backgrounds).
- Multi-Metering : A bit of combination of both. Again, it can be problematic with scenes that have a lot of dark or bright areas.
These are the 3 that come on my camera and most. Now, there are some other types of metering but they are similar and in our application, spot metering really is the best way to go.
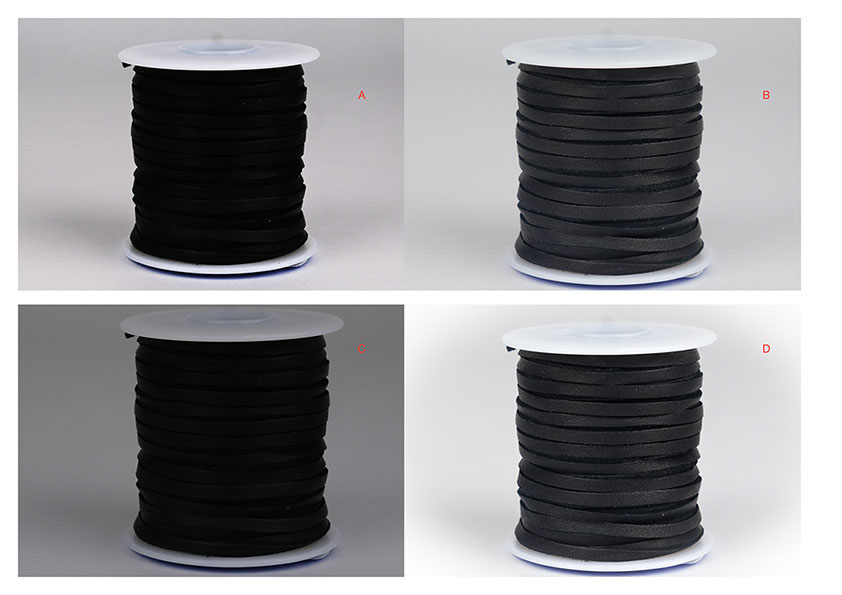
I have done 2 sets of shots for you :
- I changed between the 3 metering types plus did the some post work for a "final" pic that I would use, specifically I made the background more white. To get it this white naturally, you would need more lighting. That is why it will look gray. The product and background are being lit by the same source, so you can only alter the brightness of both, not each one individually. I personally edit to bring out the white background more as it showcases our products best that way. It is not that difficult and fairly quick.
- I did the same thing with a different product as pure black on white is not the greatest example. In fact it's one of toughest and not the best to showcase different metering. I figured I would give you another to look at.
Please note, I used the standard backdrop here just because that is what we would use normally. The lightbox is actually probably better suited for the lace as it is small and would have bought out the white background better but I wanted to show you a more standard picture.
Here is the legend for the pics :
Lace :
A -Spot Metering
B -Multi Metering
C- Average Metering
D - Multi w/editing (pure black subject against a lighter background is the only very rare time I would choose to use this metering)
Foot :
A -Spot Metering
B -Multi Metering
C- Average Metering
D- Spot w/editing (This would be what is recommended 95% of the time)
One last thing I want to mention is how our brain perceives things depending on what background or shadows are in the picture. Check out the picture I also attached called test.
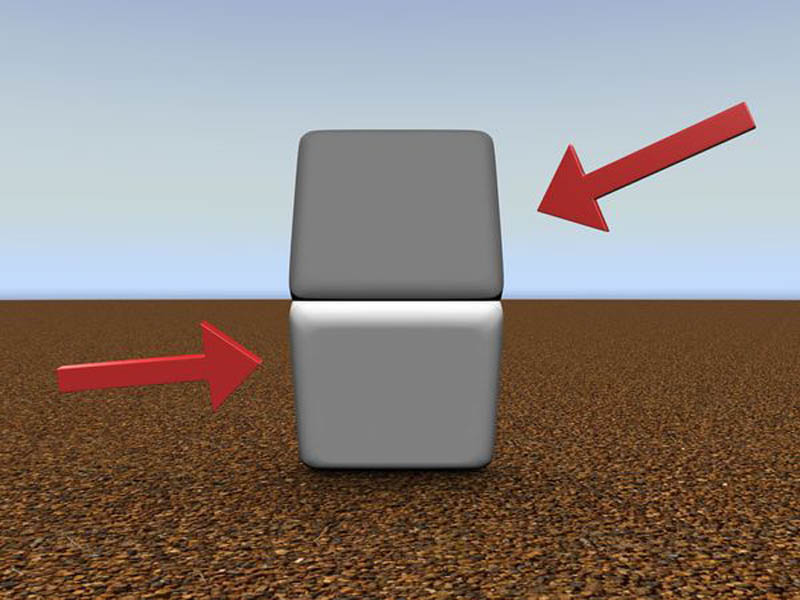
The top square looks a lot darker than the bottom square, however, they have exactly the same brightness. The reason why we perceive a brightness difference is because the brain thinks that the bottom square is in a shadow while the top square is exposed to bright light. This prompts the brain to increase the brightness of the lower square relative to the top square.
If you put your finger between the two squares so that you don't see the boundary between them, then the effect goes away, the two squares will look as bright.
I hope this information and the pictures help.